How to set up a contact form using Mailgun and Nuxt 3
This websites contact form is built using the email sending platform Mailgun. They offer a free plan that is enough for simple websites like this one. Whenever someone submits a message, I get an email notification. That's it.
I am using Nuxt, but obviously most of this tutorial would be the same or very similar for other technologies.

Account and API Key
You start by creating a free account with mailgun.com. There you need to generate an API Key and configure a sending domain.
FYI, since this confused me a bit in the beginning: some things in Mailgun are region specific (EU and USA), but the API key is not. It can be found under Account Settings > API Security.
The full API key is displayed only once when you create it. Therefore, copy it right away to your .env file and the equivalent location where you host your app or website. If you lose the key, you will have to delete it and generate a new one.
When you start configuring your Sending Domain you will see something called Sending API keys under each domain, that is not the one you need.
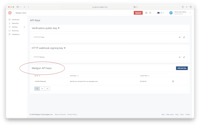
Configuring the sending domain
To be able to send your emails you should configure a subdomain. For example something like mg.yourwebsite.com.
In the Mailgun dashboard you should find Sending Domains. By default there is already a sandbox domain in there, but it is recommended to use a subdomain. Using a subdomain you will be able to send emails from your root domain e.g. yourname@yourwebsite.com.
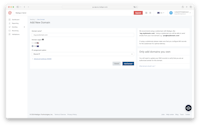
In the Mailgun UI, you have to chose between EU or US server.
In the UI, you first have to chose between EU servers, or servers in the US. I picked EU since I am based there (more on that in this blog). For the sending domain to work, you need to configure your DNS correctly.
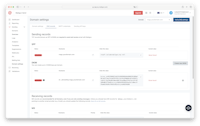
The Mailgun UI showing the DNS to configure to use a sending domain.
What is needed in terms of DNS changes:
- One SPF entry (added as a TXT record)
- One DKIM entry (added as a TXT record)
- Two MX records
- One CNAME record
When you have configured this where you configure your DNS, you should get green Verified badges under Domain settings > DNS records. I configured this through Netlify and got the green badges right away.
Packages and code
You will need one npm package and that is mailgun.js. Make sure not to use the deprecated mailgun-js package.
npm install mailgun.jsIn your .env file, you need two things. The API key and the sending domain. Your file could look something like this.
MG_API_KEY=8bb6rr9b78a18be46e89761677af892a-74e2bd11-1e185ee4
MG_DOMAIN=mg.yourdomain.com
You can create a component that displays the UI for your contact form and takes care of some functionality on the client side like submitting the form. It could for example look like this.
<script setup>
const form = ref({
  name: '',
  email: '',
  message: '',
})

const submitForm = async () => {
  const response = await fetch('/api/submit-contact-form', {
    method: 'POST',
    headers: {
      'Content-Type': 'application/json',
    },
    body: JSON.stringify(form.value),
  })

  if (response.ok) {
    await navigateTo('/success/')
  } else {
    alert('There was an error sending your message.')
  }
}
</script>

<template>
  <form class="contact-form" @submit.prevent="submitForm">
    <div class="contact-form__top-row">
      <div>
        <label>
          <div>Name</div>
          <input v-model="form.name" type="text" name="name" />
        </label>
      </div>
      <div>
        <label>
          <div>Email</div>
          <input v-model="form.email" type="email" name="email" />
        </label>
      </div>
    </div>
    <div>
      <label>
        <div>Message</div>
        <textarea v-model="form.message" name="message"></textarea>
      </label>
    </div>
    <div class="contact-form__bottom-row">
      <button>Send message</button>
    </div>
  </form>
</template>
This code is kept very basic to keep this article short and simple, but we could for example improve error handling and add some captcha solution. The form above posts the data using a function that we will set up next.
The backend function
Here is how you could write your submit-contact-form.post.ts file. You would place it in the folder /server/api/submit-contact-form.post.ts. This function depends on the keys from the .env file. The .post in the filename, indicates the matching HTTP Method.
import formData from 'form-data'
import Mailgun from 'mailgun.js'

export default defineEventHandler(async (event) => {
  if (!process.env.MG_DOMAIN || !process.env.MG_API_KEY) {
    return {
      success: false,
      message: 'Missing API keys or domain.',
      error: { message: 'Missing API keys or domain.' },
    }
  }

  const body = await readBody(event)
  const mailgun = new Mailgun(formData)
  const mg = mailgun.client({
    username: 'api',
    key: process.env.MG_API_KEY,
    url: 'https://api.eu.mailgun.net',
  })

  const data = {
    from: 'Leopold Kristjansson <leopold@yourwebsite.com>',
    to: 'leopold@yourwebsite.com',
    subject: `YourWebsite.com contact form submission [${body.email}]`,
    text: `Name: ${body.name}\nEmail: ${body.email}\nMessage: ${body.message}`,
  }

  try {
    const response = await mg.messages.create(process.env.MG_DOMAIN, data)

    return {
      success: true,
      message: 'Email sent successfully!',
      emailResponse: { id: response.id, message: response.message },
    }
  } catch (error) {
    console.error('Mailgun error:', error)

    if (error instanceof Error) {
      return {
        success: false,
        message: 'Failed to send email.',
        error: { message: error.message },
      }
    } else {
      return {
        success: false,
        message: 'Failed to send email.',
        error: { message: 'An unknown error occurred' },
      }
    }
  }
})
The function above only forwards the message posted to the form to the recipients email address. We could extend this to send a thank you message to the sender as well.
You should have something working now. Hope this helped!